Font Styles and Weights
To specify font styles, use the following style:
-font-style: type
-Normal, italic, abliqueTo control font weight for any page element, use the following style:
-font-weight: weight
-Range from 100 – 900 (with increment of 100)
Decorative Features
To change the appearance of your text, use the following style:
-text-decoration: type
Underline, overline:
-text-decoration: underline overline
Capitalize:
-text-transform: capitalize
Uppercase letters, small font:
-font-variant: type
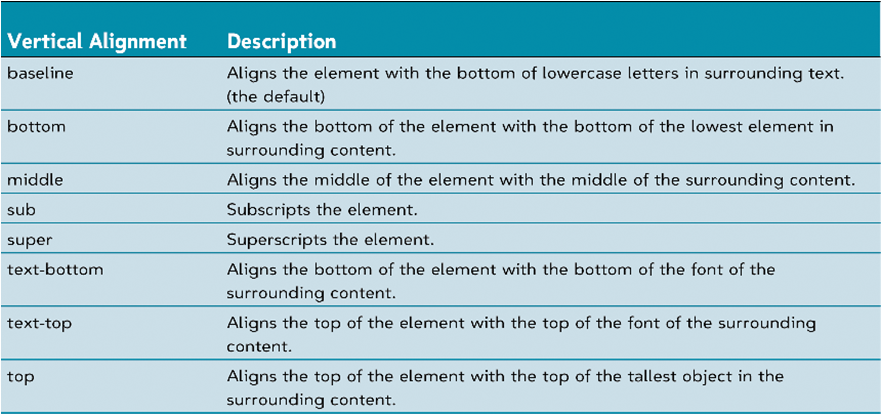
Text Alignment
Choosing an Image Format
GIF (Graphics Interchange Format) is the most commonly used image format on the Web.Compatible with virtually all browsers.GIF files are limited to displaying 256 colors.Often used for graphics requiring fewer colors, such as clip art images, line art, logos, and icons.Images that require more color depth, such as photographs, can appear grainy when saved as GIF files.
Interlaced and Noninterlaced GIFs
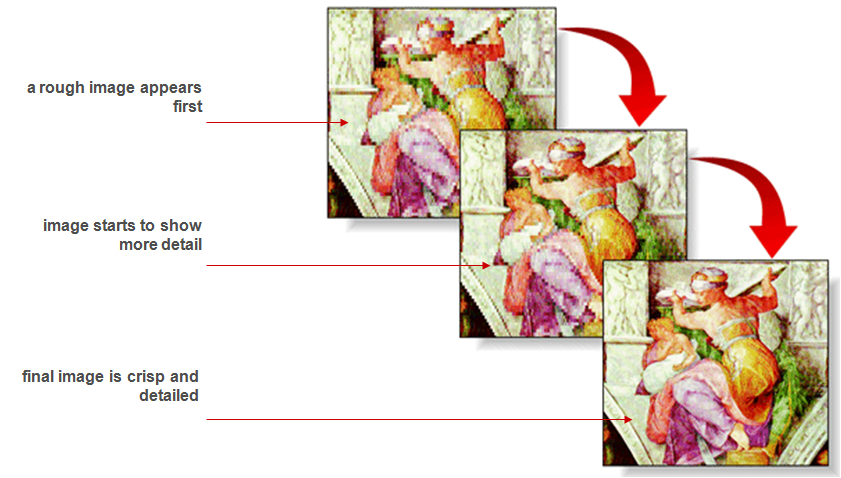
Interlacing refers to the way the GIF is saved by the graphics softwareNormally, with a noninterlaced GIF the image is saved one line at a time, starting from the top of the graphic and moving downwardWith interlaced GIFs, the image is saved and retrieved “stepwise”
-For example, every fifth line of the image might appear first, followed by every sixth line, and so forth through the remaining rowsInterlacing is an effective format if you have a large graphic and want to give users a preview of the final image as it loadsInterlacing can increase the size of a GIF file by anywhere from 3 to 20 kilobytes, depending on the image
Noninterlaced Graphic
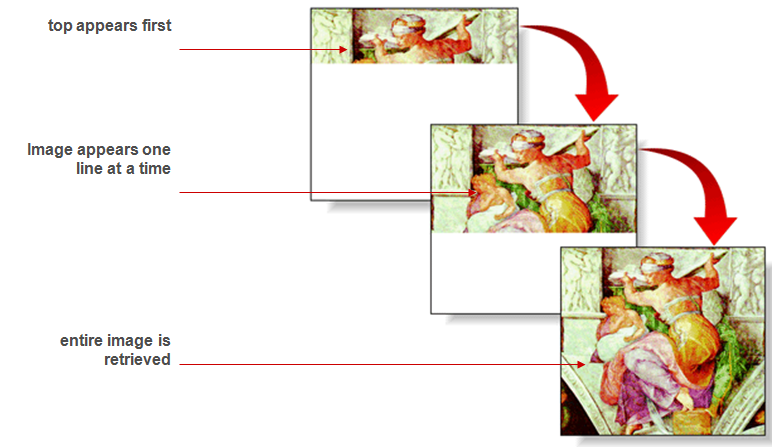
Noninterlaced Graphic
Transparent GIFs
A transparent color is a color from the image that is not displayed when the image is viewed in an applicationIn place of a transparent color, the browser will display whatever is on the page backgroundMethods for creating a transparent color depends on the graphic software usedMany applications include the option to designate transparent color when saving the image i.e. PhotoShop
Animated GIFs
GIFs are also commonly use to create animated imagesAnimated GIFs are easy to create and smaller in sizeAn animated GIF is composed of several images that are displayed one after the other in rapid successionAnimated GIFs are an effective way to compose slide shows or to simulate motionAnimated GIF files are typically larger than static GIF imagesThe use of animated GIFs can greatly increase the size of a Web pageBe careful not to overwhelm the user with animated imagesAnimated GIFs are limited to 256 colors and can use transparent colorsEarly browser versions may not support animated GIFs
JPEG
JPEG stands for Joint Photographic Expert Group.Create image that use the full 16.7 million colors available in the color palette.JPEG files are usually smaller (but not always) than GIF.Use JPEGs for photos and GIFs for illustration that involve only a few colors.
Portable Network Graphics (PNG)
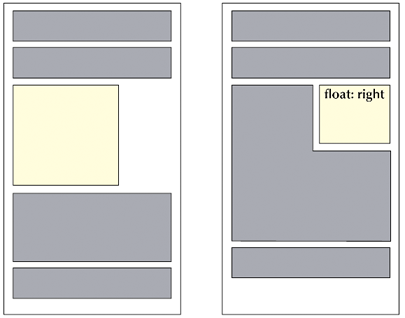
A new file format called PNG (Portable Network Graphics) has been createdPNG files use a free and open file format and can display more colors than GIFsPNGs cannot be used for animated graphicsPNGs do allow transparent colors, but not all browsers support this featureThe syntax for the float style is: float: position
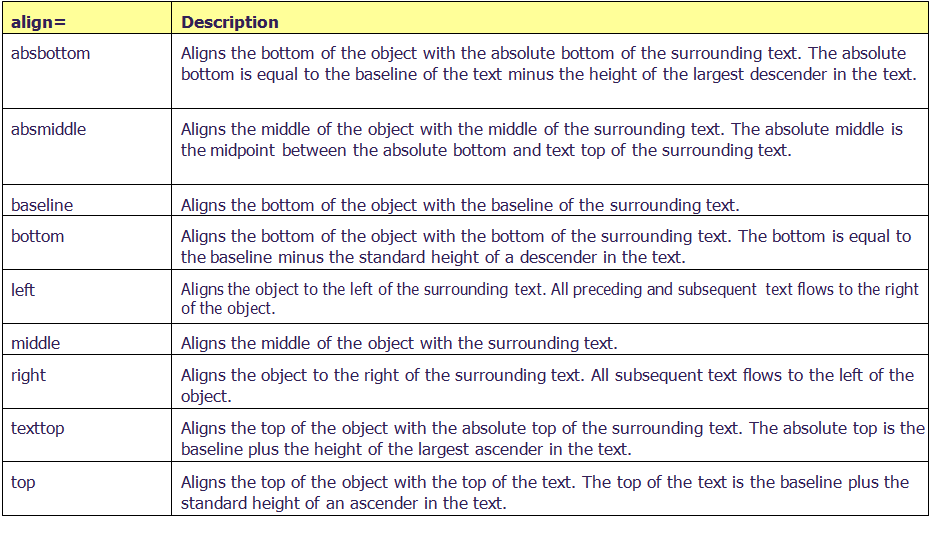
 For some older browsers, you need to use the align attribute, which is now deprecatedThe syntax for the align attribute is:
<img align=“position” />
-alignment indicates how you want the graphic aligned in relation to the surrounding text
Alignment Options
Margins
Control your margins with the following four styles:
-margin-top: length
-margin-right: length
-margin-bottom: length
-margin-left: lengthMargin values can also be negative- this creates an overlay effect by forcing the browser to render one element on top of anotherYou can also combine the four margin styles into a single style
Inserting a Background Image
The syntax for inserting a background image is: background-image: url(url)
-URL is the location and filename of the graphic file you want to use for the background of the Web page
<body background=“brick.gif”>In choosing a background image, you should remember the following:
-use an image that will not detract from the text on the Web page, making it hard to read
-do not use a large image file (more than 20 kilobytes)
-be sure to take into consideration how an image file looks when it is tiled in the background
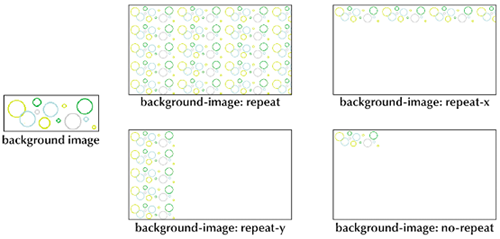
Background Image Options
background-repeat: type
Understanding Image Maps
To use a single image to access multiple targets, you must set up hotspots within the imageA hotspot is a defined area of the image that acts as a hypertext linkWhen a user clicks within a hotspot, the hyperlink is activatedHotspots are defined through the use of image maps, which list the positions of all hotspots within an imageThere are two types of image maps: server-side image maps and client-side image maps
Server-Side Image Maps
In a server-side image map, the image map is stored on the Web serverServer-side image maps are supported by most graphical browsersServer-side image maps can be slow to operateThe browser’s status bar does not display the target of each hotspot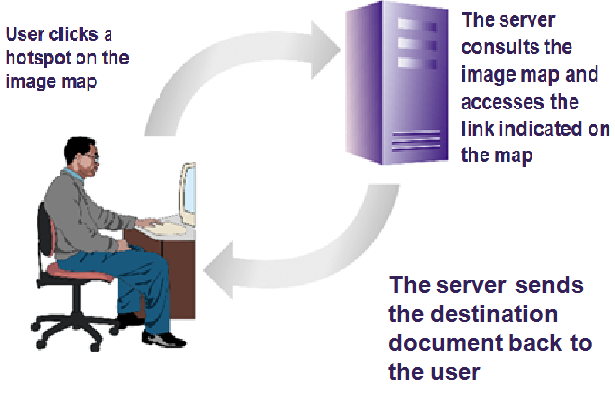
Client-Side Image Maps
A client-side image map is inserted in an image map into the HTML fileThe browser locally processes the image mapBecause all of the processing is done locally, you can easily test Web pagesMore responsive than server-side mapsThe browser’s status bar displays the target of each hotspotOlder browsers do not support client-side images
Defining Image Map Hotspots
Define a hotspot using two properties:
-Its location in the image
-Its shapeSyntax of the hotspot element:
<area shape=“shape” coords=“coordinates” href=“url” alt=“text” />Use a special program that determines the image map coordinatesMost image map programs generate the coordinates for hotspots, as well as, the necessary HTML code
Creating a Rectangular Hotspot
Two points define a rectangular hotspot:
-the upper-left corner
-the lower-right cornerA sample code for a rectangular hotspot is:
<area shape=“rect” coords=“384,61,499,271” href=“water.htm”>coordinates are entered as a series of four numbers separated by commasthe first two numbers represent the coordinates for the upper-left corner of the rectangle, and the second two numbers indicate the location of the lower-right cornerthe hotspot is a hypertext link to water.htm
Creating a Circular Hotspot
A circular hotspot is defined by the location of its center and its radiusA sample code for a circular hotspot is:
<area shape=“circle” coords=“307,137,66” href=“karts.htm”>
-coordinates are (307, 137), and it has a radius of 66 pixels
-the hotspot is a hypertext link to karts.htm
Creating a Polygonal Hotspot
To create a polygonal hotspot, you enter the coordinates for each vertex in the shapeA sample code for a polygonal hotspot is:
<area shape=“polygon” coords=“13,60,13,270,370,270,370,225,230,225,230,60” href=“rides.htm”>
-coordinates are for each vertex in the shape.
-the hotspot is a hypertext link to rides.htm
Using an Image Map
To apply an image map to an inline image, you need to insert the following attribute into the <img /> tag
usemap = “#map”E.g.
<img src = “parkmap.gif” usemap = “#parkmap”>
<map name = “parkmap” id = “parkmap”>
<area shape=“circle” coords=“307,137,66” href=“karts.htm” />
</map>