Search This Blog

Tuesday, October 12, 2010

Chapter 6 - Creating Web Page Forms

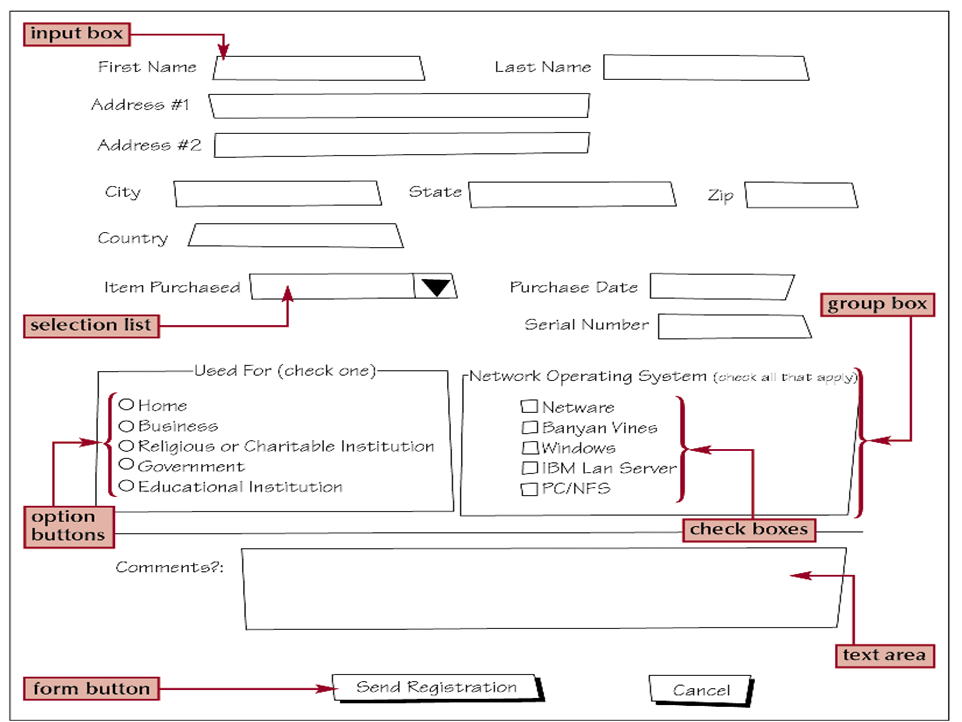
Introducing Web Forms


  • Web forms collect information from customers

  • Web forms include different control elements including:
    -Input boxes
    ~For text and numerical entries
    -Selection lists, Drop-down lists boxes
    ~For long lists of options, usually appearing in a drop-down list box
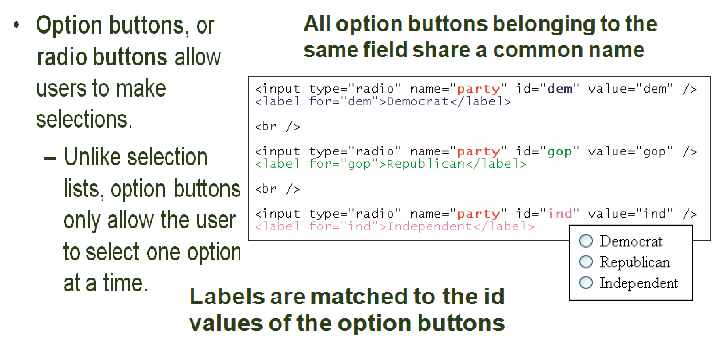
    -Option buttons or radio buttons
    ~For selecting a single option from a predefined list
    -Check boxes
    ~For specifying an item as either present or absent
    -Group boxes
    ~For organizing form elements
    -Text areas
    ~For extended entries that can include several lines of text
    -Form buttons
    ~Users can click to start processing the form


  • Forms and Server-Based Programs


  • While HTML supports the creation of forms, it does not include tools to process the information

  • The information can be processed through a program running on a Web server

  • Server-based programs are written in many languages

  • The earliest and most commonly used are Common Gateway Interface (CGI) scripts that are written in perl

  • Other popular languages include:
    -AppleScript - PHP
    -ASP - TCL
    -ColdFusion - the Unix shell
    -C/C++ - Visual Basic


  • Creating the Form Element


  • Forms are created using the form element, structured as follows:
    <form attributes>
    elements
    </form>

    Where attributes are the attributes that control how the form is processed and elements are elements places within the form
  • Form attributes usually tell the browser the location of the server-based program to be applied to the form’s data

  • Always specify an id or name for the form

  • Two attributes are available to identify the form: id and name

  • The syntax of the id and name attributes are as follows:
    <form name=“name” id=“id”>… </form>

  • Where name is the name of the form and id is the id of the form


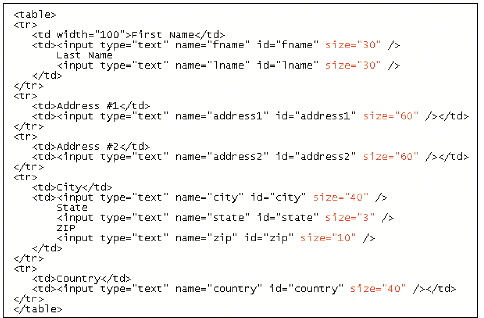
  • Creating Input Boxes


  • The general syntax of input elements is as follows:
    <input type=“type” name=“name” id=“id” />

    Where type specifies the type of input field, and the name and id attributes provide the field’s name and id.

  • See figure 6-5 for other input types


  • Setting the Size of an Input Box


  • By default, an input box displays at 20 characters of text

  • To change the width of an input box, use the size attribute which is displayed as follows:
    <input size=“value” />

    Where value is the size of the input box in characters


  • Creating a Password Field


  • A password field is an input box where characters typed by the user are displayed as bullets or asterisks to protect private or sensitive information on a Web site

  • The syntax for creating a Password field is as follows:
    <input type=“password” />


  • Creating a Selection List


  • A selection list is a list box from which a user selects a particular value or set of values.
    -Selection lists are useful when there are a fixed set of possible responses from the user

  • You can create a selection list using the <select> tag

  • You can specify each individual selection item using the <option> tag


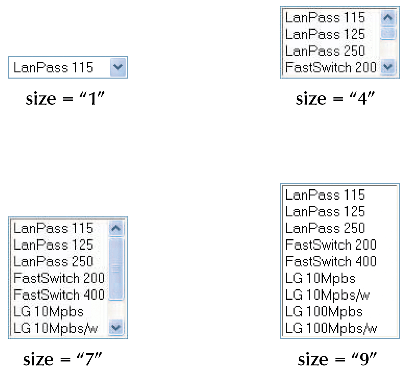
  • Modifying the Appearance of a Selection List


  • You can change the number of options displayed in the selection list by modifying the size attribute.
    The syntax is as follows:
    <select size= “value”>… </select>

    Where value is the number of items that the selection list displays in the form


  • Making Multiple Selections


  • Add the multiple attribute to the select element to create multiple selections
    -<select multiple=“multiple”>… </select>


  • Working with Option Groups


  • Use option groups to organize selection lists into distinct groups
    <select attributes>
    <optgroup label=“label1”>
    <option>itema1</option>
    <option>itema2</option>

    <select attributes>
    <optgroup label=“label1”>
    <option>itema1</option>
    <option>itema2</option>

    </optgroup>

    </select>


  • Creating Option buttons


    Creating a Field Set


  • HTML and XHML allow you to organize option buttons into a group of fields called field sets
    -Most browsers place a group box around a field set to indicate that the fields belong to a common group

    <fieldset>
    fields
    </fieldset>

    Where fields are the individual fields within a set


  • Creating Check Boxes


  • To create a check box, use:
    <input type=“checkbox” name=“name” id=“id”value=“value” />

    Where the name and id attributes identify the check box field and the value attribute specifies the value sent to the server if the check box is selected

  • To specify that a check box be selected by default, use the checked attribute as follows:
    <input type=“checkbox” checked=“checked” />
    or
    <input type=“checkbox” checked />


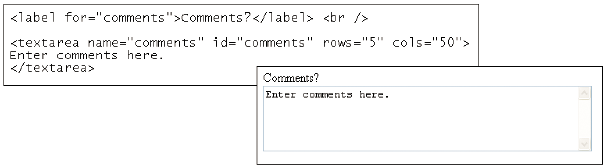
  • Creating a Text Area Box


  • Text area boxes allow users to enter comments about the products they’ve purchased

  • An input box would be too small to accommodate the length of text for this use

  • To create a text area box, use the textarea element:
    <textarea name=“name” id=“id” rows=“value” cols=“value”>
    default text
    </textarea>

    Where the rows and cols attributes define the dimensions of the input box and the rows attribute indicates the number of lines in the input box


  • Working with Form Buttons


  • Buttons are a type of control element that performs an action

  • Types of buttons:
    -Command button
    -Submit button
    -Reset button
    -File button


  • Creating a Command button


  • Command buttons are created using the <input> tag:
    <input type=“button” value=“text” />

  • Submit buttons submit forms to the server for processing when clicked. Syntax is as follows:
    <input type=“submit” value=“text” />

  • Reset buttons reset forms to their original (default) values. Syntax is as follows:
    <input type=“reset” value=“text” />


  • Creating a File button


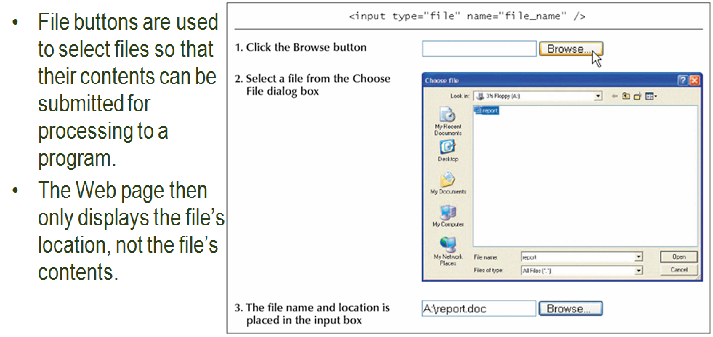
    Working with Hidden Fields


  • Hidden fields are added to a form, but not displayed in the Web page. The syntax is as follows:
    <input type=“hidden” name=“name” id=“id”


  • Working with Form Attributes


  • After adding the elements to your form, you’ll need to specify where to send the form data and how to send it. Use the following attributes:
    <form action=“url”method=“type”enctype=“type”>… </form>

    Where url specifies the filename and location of the program that processes the form and the method attribute specifies how your Web browser sends data to the server. The enctype attribute specifies the format of the data stored in the form’s field

  • The method attribute can have one of two values:
    -Post
    -Get

  • The get method is the default; get appends the form data to the end of the URL specified in the action attribute

  • The post method sends form data in a separate data stream, allowing the Web server to receive the data through “standard input”


  • Using the mailto Action


  • The mailto action accesses the user’s own e-mail program and uses it to mail form information to a specified e-mail address.
    -By-passes the need for server-based programs

  • The syntax is as follows:
    <form action-mailto:e-mail_address method=“post”
    enctype=“text/plain”> … </form>

    Where e-mail_address is the e-mail address of the recipient in the form


  • Specifying the Tab Order


  • Users typically navigate through a form with the tab key

  • You can specify an alternate tab order by adding the tabindex attribute to any control element in your form

  • The syntax is as follows:
    <input name=“fname” tabindex=“1” />

    This syntax assigns the tab index number “1” to the fname field from the registration form.


  • Specifying an Access Key


  • An access key is a single key typed with the Alt key (Windows) or Control key (Mac), in order to jump to one of the control elements in the form

  • Create an access key by adding the accesskey attribute to any control element

  • Example of creating an access key for the lname field:
    <input name=“lname” accesskey=“1” />


  • back to top